2 Minutes installation process
First of all, please be sure your server meets the system requirements and that your WordPress installation is correctly performed. We made a plugin to check your server status, and highlight any missing requirements. Please find it on the Server Check plugin page.
You can install your new theme in the following ways:
- From the admin dashboard, using the WordPress theme installer (easiest method).
- Manually via FTP
Please make sure that you start from a fresh WordPress installation, without any plugin(s).
Automatic theme installation
- Login to your website in /wp-admin
- Go to Appearance > Themes
- Click Install Themes and then Upload
- Click on the “Browse” button and select the zipped folder of the theme from your computer.
- Upload the theme called kentha.zip but DO NOT ACTIVATE IT
- Once done click on “Return to themes”
- Click “add new” and upload the theme kentha-child.zip
- Activate kentha-child.zip
- Install the required plugins (please read next manual chapter)
Troubleshooting:
Error: The theme is missing the style.css stylesheet
If you see this error, it means that you are trying to upload the entire product package instead of the correct theme zip file. Please unzip the product folder in your computer and upload only the theme zip file and the child theme’s zip file.
Error: Are you sure you want to do this?
Please check system requirements.
Manual theme installation (FTP installation)
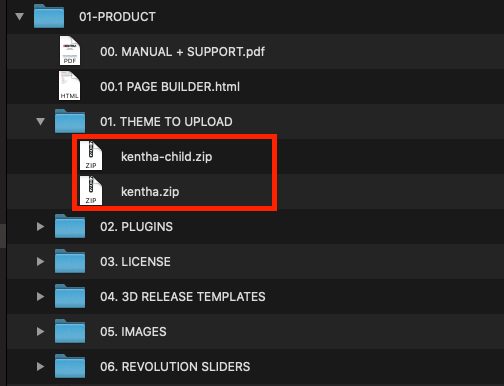
- Download the zipped theme folder and extract it on your local PC.
- Locate the correct theme folder inside of the unzipped folder, it will contain kentha-child.zip and kentha.zip
- Make sure you unzip the correct theme folders (kentha.zip andkentha-child.zip). This will produce 2 folders: kentha and kentha-child
- Connect to your hosting provider using an FTP client (e.g. Filezilla is one of the best free FTP clients, you can get it here)
- Navigate to your WordPress installation folder (usually is not the root folder but it should be public_html, www or something else, depending on your hosting provider settings).To be sure that you are in the WordPress folder, you should see the following three folders inside:
– wp-content
– wp-admin
– wp-includes - Navigate to wp-content/themes
- Upload the two previously unzipped theme folders (kentha and kentha-child, see step 2. above) in wp-content/themes folder.
- On your browser navigate to the admin dashboard of your wordpress site (usually yoursite.com/wp-admin)
- Go to Appearance-> themes and activate: Kentha Child
- Install the required plugins (next manual chapter)
If you encounter any activation problem please check the system requirements, your WordPress version and disable any plugin you may have in your website.
WHAT IS A CHILD THEME AND WHY YOU SHOULD USE IT:
This theme provides a child theme, making it easier to update your site with new theme versions without losing any customizations or settings. The following instructions will teach you how to correctly install and activate the theme using the child theme, which will make your life much easier down the line:
Need support?
- Make sure the server meets the requirements
- Make sure to disable every external plugin while installing the theme
- Take a full screenshot of the Server Check result page
- Open a helpdesk request including every website detail and link the screenshot using a service like DropBox or https://imgur.com